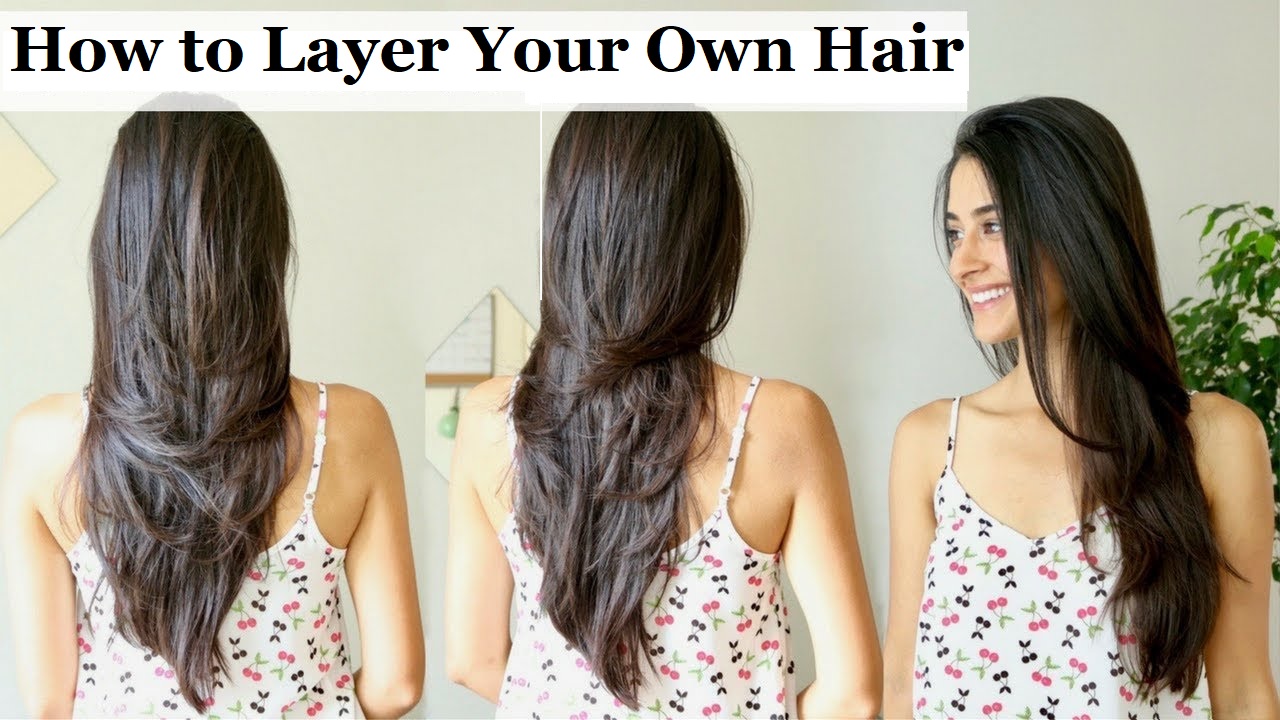
Who doesn’t want a freshen-up hairstyle with an illusion of volume?
Of course, everyone wants it! And I guess the layered cut is the best flattering way to achieve it. Layer cut works well in any type of face shape. Whether your hair is curly or straight, it works equally pretty much well!!
But I never recommend you cut your own hair unless you are an expert. Cutting hair is not as easy job as it seems!
But in case, you are desperately in need of trim on your hair & can’t go to the salon right now, and then it is high time to give your hair a layer at home. Plus it will save you money.
So if you need layering a try, in this article I will share some basic strategies about How to layer your own hair at home.
Types of Hair for Layer Cut
You may be wondering that how does your hair looks so manageable, better texture, and fluffy after your trip to your stylist? Well, the answer is, various layers and layered haircuts.
Different types of layers create different types of looks for different types of hair. You need to identify your hair and what look suits you the best and then choose the type of layer cut accordingly.
Here are some different types of layer cuts –
- V-shaped layer cuts for long hair
- Sleek lob for minimal layers
- Choppy layers
- Wispy layered on thin hair
- Textured choppy layer cuts for medium hair
Let’s proceeds.
How to layer your own hair: Make your hair & tools ready at first
- Since you’re trimming your hair at home & you are not a professional, so take some time in front of a mirror to decide where you need the layers to be. Some prefer long, characteristic-looking layers, while others pick bolder looks. Actually, it based on two factors. They are:
Hair surface- Layering adds extra volume to your hair, particularly when a portion of the layers is short long. In the event that your hair is now full-bodied or wavy, you might need to go for longer layers that don’t vary a lot to outline your face.
Face shape- Consider what layer length suits your face. Longer layers look flawless with round or square faces, while shorter layers complement faces that are oval or heart-molded.
- The most significant instrument required to ensure your layer cut looking incredible is a sharp, proficient pair of stylist scissors, additionally called shears. Normal craft scissors or kitchen scissors don’t work well. Get some great scissors from your nearby beauty store.
- Now it’s time to set up your little barbershop – especially your bathroom. There you will find water & mirror both. Additional things you may require- a towel, a couple of hair clips for holding your hair, comb, scissors & a water spray bottle. You may also keep a second mirror to look at your back if necessary.
- At the point when you’ve set up everything, start by washing your hair and brush out the knot with a wide-toothed comb. Dry it by towel but keep it damp a little bit. You’ll accomplish the best outcomes by beginning with clean hair.
Layering Long Hair
You already prepared your hair and set up your tools. Now, all you need is just layering your hair, right?
If you have long hair, this is the simplest way you can proceeds:
Assemble your hair at the top of your head
Keep the braid at the pinnacle of your head where you can brush with a comb. Twist around so your head is topsy turvy, brush your hair forward, and utilize your hands to form a braid at the highest point of your head.
Now, fasten it there with a hairband, and afterward turn your head straight up. Ensure your hair is enough to smooth; otherwise any bumps or tangled parts could bring damage to your all efforts.
Move the hair band down to the braid
Next, hold the braid by using one hand and let the other hand slide the hair band down until it’s two or three creeps from the finish of the ponytail.
Moreover, if you need inconspicuous layering, slide it down more & keep only an inch or so of hair in the braid. For progressively uncommon layers, leave a couple of inches of hair as recommended.
In case, you are confused about “where to stop” it is better to keep down the band until a couple of bits of hair slide out around the scruff of your neck.
Cut the finish of the braid
Now, hold your hair & apply a sharp pair of haircutting scissors to trim the remaining part of your hair under the hairband. And then, shake out your hair.
In case, your hair is very thick, you may need to trim through the braid couple of times more than one area. Simply ensure you cut each area at a similar length, not much.
Be mindful so as not to cut at an edge or let the scissors slip. Cut straight forward for even layers.
Checkout your layers
Finally, the layer is done. But remind that this strategy makes a couple of face-surrounding layers in the front with longer layers in the back. So, if you’d prefer to alter the length of your layers, utilize the scissors to painstakingly trim individual locks of hair.
Ensure that you go so gently and carefully cut it to decrease the odds of committing an error.
Layering Short Hair
Layering short hair is tougher than layering long hair. As here you need to make each layer separately. So start by washing and cleaning your hair and then towel it as usual. Then take a look in front of a mirror and choose precisely where you need the layers to be and how short you need them before you start.
Now proceeds for further trimming:
Brush your hair into segments
To layer short hair, at first, you need to separate your hair into different sections before starting. To do so you can simply apply a comb in the following way:
- Make a “top box” area by making a section on either side of the head where the head starts to round. These two parts make another segment of hair in the middle of the head.
- Now, brush this “top box” forward and brush the hair to either side straight down, so the areas are plainly outlined. It might likewise assist with twisting your hair before cutting it.
- Separate the remaining part into two sections: the initial segment reaches out towards your forehead, and the subsequent part stretches out to the scruff of your neck.
Apply a brush to lift the frontier area of the top box
Drive the hair at a ninety-degree edge from your head and hold it straight between your pointer and center finger. Your fingers ought to be opposite to your head & comb it with a brush.
Cut the top box
Now, apply sharp scissors to cut the tips of the hair stretching out from between your fingers. Allow the hair to fall, at that point utilize the brush to drive another segment of hair that is promptly behind your front segment.
Then again, brush the hair from the main segment into this new segment. This will help you to measure the right length. Drive it at a 90-degree edge from your head & hold it between your pointer and center finger (as you do before).
After all, cut the tips to precisely the same length as the principal segment of hair you cut.
Keep cutting hair from the top until you’ve cut the whole front and back areas of the case.
Utilize a water spray bottle to keep the hair sodden as you go. On the off chance that your hair gets excessively wet, dry it with a towel. Other it will turn messy.
While you are cutting, give full attention to your hair and scissors. In the case of layering short hair, trimming a similar area twice or any small mistake can have a major effect.
Remember: All hair ought to be cut to a similar length. When it is done, the layer will appear naturally.
Part your hair down the center
When the whole top box has been cut, change the piece of your hair by brushing it to the sides with the goal that you have a section straight down the center.
Cut the sides of your hair
Working from the front of your hair around the side to the back, drive areas of hair directly from the highest point of your head and hold tightly with your fingers. Again, keep your fingers are opposite to your head.
Now, apply the scissors to cut the remaining tips of your hair, and then proceed onward to the following area. Rehash this process until you’ve cut the top layer of hair on one side of your head. Do it in the same way on the opposite side.
Check your layers
Well, you have done the layer. Now it is time to check it in front of a mirror.
- In case, you found an uneven spot, or you need further shorter layers, utilize the scissors again to painstakingly trim your hair a little bit.
- Now, you can likewise refine the edges. Brush your hair into the style you intend to do and cut the edges. Check around the ears and the rear of the hairline particularly.
Final Verdict
So here we see How to layer your own hair at home for both long & short hair in the easiest & simplest way. You don’t need to be a hairstylist or a professional beautician to do it. So stay home, save your money & do your layer by own. If you need further tips about layering hair, just hit me in the comment section.